Quests
Discover 22 unique quests across the Forgotten Runiverse. Click a quest to reveal its objectives and guidance.
🔍
×
Quest #1: The Gathering Tree
+
Quest #1: The Gathering Tree
VIDEO
Watch Quest #1 Guide on YouTube
Objective: Assist the Green Emissary in gathering sacred items and protecting the forest from threats.
Steps:
Talk to the Green Emissary at #1 to trigger the quest.
On your way to #2 , pick up the flowers and talk to the elf along the dirt road.
Talk to the Attendant at #2 .
Pin the location of #2 .
Craft the flower hat at #3 .
Level up your character to at least level 3 .
Teleport back to #2 .
Defeat the fox and the crow .
Craft the Old Pilgrim Staff at #3 .
Return to #2 .
Defeat the bear at #4 .
Return to #2 .
Report back to #1 .
Quest Complete .
Quest #2: The Mining Rights
+
Quest #2: The Mining Rights
VIDEO
Watch Quest #2 Guide on YouTube
Objective: Secure the mining rights by defeating enemies and completing tasks in the cave.
Steps:
Talk to the Red Emissary to trigger the quest at #1 .
Craft Heat Wave at #2 .
Battle some monsters on along your way to #3 .
Level up to at least level 5 .
Defeat the Orc at the cave entrance.
Enter the cave.
Go to the middle, set the tents on fire using Heat Wave .
Defeat the guards.
Head north and defeat the Captain .
Enter EXECUTE the room.
Defeat Gaines .
Go back to #1 .
Quest Complete .
Quest #3: The Cockatrice Hunt
+
Quest #3: The Cockatrice Hunt
VIDEO
Watch Quest #3 Guide on YouTube
Objective: Hunt down the Cockatrice by following clues and defeating enemies.
Steps:
Talk to the red hair NPC to trigger the quest at #1 .
Walk towards the Cockatrice nest and talk to the bearded guy at #2 .
Continue walking and talk to the wolf guy at #3 .
Continue walking and talk to the wolf guy at #4 .
Check the nest at #5 (empty).
Talk to the wolf guy at #4 .
Talk to the fisherman at #6 .
Defeat the bear at #7 .
Go back to the fisherman at #6 .
Receive the fish (bait).
Talk to the wolf guy at #4 .
Place the bait at #5 .
Defeat Cockatrice .
Submit Quest at #1 .
Quest Complete .
Quest #4: Sparks of Innovation
+
Quest #4: Sparks of Innovation
VIDEO
Watch Quest #4 Guide on YouTube
Objective: Assist the Blue Emissary and Professor Hadrien in their innovative experiment by defeating the Zapbender and placing Anthenna's.
Steps:
Talk to the Blue Emissary at #1 to trigger the quest.
Head over to Professor Hadrien 's camp at #2 .
PIN LOCATION #2 .
Talk to the Prof and his associates.
Head over to #3 .
Defeat the Zapbender at #3 .
Touch the charged rock after defeating the Zapbender .
Report back to the Prof at #2 .
The Prof at #1 will ask you to place Anthenna's .
Place them at #2 , #3 , and #4 .
Report back to #1 .
Quest Complete .
Quest #5: The Fairies' Playground
+
Quest #5: The Fairies' Playground
VIDEO
Watch Quest #5 Guide on YouTube
Objective: Help the Yellow Emissary and the Hippies in creating a magical playground for the fairies.
Steps:
Talk to the Yellow Emissary at #1 to trigger the quest.
Head over to the Hippies at #2 .
Head north to the meet the Hippies at #3 .
PIN LOCATION #3 .
Head back to #1 .
Talk to the Blue Mage at #4 .
Craft Fae Light .
Locate the Fairies at #5 , #6 , and #7 .
Go back to #3 talk to the Yellow Hippie .
Go back to the Yellow Emissary at #1 .
Head back to #3 .
Talk to the Hippies.
Cast Life Bloom at the flower bed just a few meters away from the Hippies to the right (at #3 ).
Talk to the Yellow Emissary beside the flower bed at #3 .
Quest Complete .
Quest #6: Hands in the Dark
+
Quest #6: Hands in the Dark
VIDEO
Watch Quest #6 Guide on YouTube
Objective: Assist Alberto in completing a dungeon at the Hollow Tree.
Steps:
Talk to Alberto at Hedge Encampment to trigger the quest at #1 .
Follow the path and head over to the Hollow Tree at #2 .
Team up with other players.
Complete the dungeon.
Go back to Alberto at #1 .
Quest Complete .
Quest #7: A Path to Knowledge
+
Quest #7: A Path to Knowledge
VIDEO
Watch Quest #7 Guide on YouTube
Objective: Answer the questions posed by the statue and the old mage to gain knowledge.
Steps:
Talk to the statue at #1 .
Follow the Path to visit each marker and answer the questions (7).
Talk to the old mage at the Beryl Plaza at #2 .
Quest Complete .
Quest #8: Into the Wild
+
Quest #8: Into the Wild
VIDEO
Watch Quest #8 Guide on YouTube
Objective: Gain the time spell by following the path and meeting the purple wizard.
Steps:
Talk to the Bag on the floor at #1 .
Make your way to the pieces of paper on the ground at #2 , #3 , #4 , and #5 .
Go to #6 to meet the purple wizard .
He will ask you about the time spell and will teleport to #7 .
Meet the purple wizard at #7 .
Tell him that you have the time spell .
Use Zoom Lvl 1 .
Quest Complete .
Note:
Must have Skill Zoom Lvl 1
Zoom is dropped by Purple Bee .
Quest #9: Follow the White Rabbit
+
Quest #9: Follow the White Rabbit
VIDEO
Watch Quest #8 Guide on YouTube
Objective: Follow the White Rabbit to defeat a creature inside the cave near Blue Bastion.
Steps:
Quest starts by talking to the White Rabbit outside the cave near Blue Bastion at #1 .
Rabbit will ask you to fight something inside the cave.
Must have the necessary equipment to proceed.
Once you have the right relic.
Fight and defeat the creature inside the cave.
Talk to the Rabbit .
Quest Complete .
Quest #10: A Special Kind of Magic
+
Quest #10: A Special Kind of Magic
Objective: Activate specialization quests by speaking to the colored mages in Blue Bastion City.
Steps:
Quest starts at #1 by talking to George .
Teleport to Blue Bastion City .
Enter through Beryl Plaza .
Go to the Mage Hall at #2 .
Speak to all 4 colored mages and activate all specialization quests (Quest 11 to Quest 14).
Exit Beryl Plaza .
From Blue Bastion make your way to #3 , #4 , #5 , and #6 in any order.
Defeat each chroma monsters on each location.
Report back to the mages at #2 .
Quests #11 to #14 Complete .
Quest #11: Path of Fire Fist
+
Quest #11: Path of Fire Fist
Objective: Follow the Path of the Fire Fist by defeating chroma monsters.
Steps:
Quest starts at #1 by talking to George .
Teleport to Blue Bastion City .
Enter through Beryl Plaza .
Go to the Mage Hall at #2 .
Speak to all 4 colored mages and activate all specialization quests (Quest 11 to Quest 14).
Exit Beryl Plaza .
From Blue Bastion make your way to #3 , #4 , #5 , and #6 in any order.
Defeat each chroma monsters on each location.
Report back to the mages at #2 .
Quests #11 to #14 Complete .
Quest #12: Path of Scholar
+
Quest #12: Path of Scholar
Objective: Follow the Path of the Scholar by defeating chroma monsters.
Steps:
Quest starts at #1 by talking to George .
Teleport to Blue Bastion City .
Enter through Beryl Plaza .
Go to the Mage Hall at #2 .
Speak to all 4 colored mages and activate all specialization quests (Quest 11 to Quest 14).
Exit Beryl Plaza .
From Blue Bastion make your way to #3 , #4 , #5 , and #6 in any order.
Defeat each chroma monsters on each location.
Report back to the mages at #2 .
Quests #11 to #14 Complete .
Quest #13: Path of the Botanic Master
+
Quest #13: Path of the Botanic Master
Objective: Follow the Path of the Botanic Master by defeating chroma monsters.
Steps:
Quest starts at #1 by talking to George .
Teleport to Blue Bastion City .
Enter through Beryl Plaza .
Go to the Mage Hall at #2 .
Speak to all 4 colored mages and activate all specialization quests (Quest 11 to Quest 14).
Exit Beryl Plaza .
From Blue Bastion make your way to #3 , #4 , #5 , and #6 in any order.
Defeat each chroma monsters on each location.
Report back to the mages at #2 .
Quests #11 to #14 Complete .
Quest #14: Path of the Harmonic Guru
+
Quest #14: Path of the Harmonic Guru
Objective: Follow the Path of the Harmonic Guru by defeating chroma monsters.
Steps:
Quest starts at #1 by talking to George .
Teleport to Blue Bastion City .
Enter through Beryl Plaza .
Go to the Mage Hall at #2 .
Speak to all 4 colored mages and activate all specialization quests (Quest 11 to Quest 14).
Exit Beryl Plaza .
From Blue Bastion make your way to #3 , #4 , #5 , and #6 in any order.
Defeat each chroma monsters on each location.
Report back to the mages at #2 .
Quests #11 to #14 Complete .
Quest #15: The Wild Rift
+
Quest #15: The Wild Rift
VIDEO
Watch Quest #15 Guide on YouTube
Objective: Explore the wild rift and defeat the dungeon with the help of the Orc.
Steps:
Trigger the quest by talking to the Orc at the Beryl Plaza (#1 ).
Head almost directly south of Blue Bastion and make your way to the Windmill at #2 .
Form a party with other players.
Defeat the Dungeon.
Report back to the Orc at #1 .
Quest #16: Cleansing the Waters
+
Quest #16: Cleansing the Waters
VIDEO
Watch Quest #16 Guide on YouTube
Objective: Cleanse the waters by defeating the dungeon at the Crib of the Moon.
Steps:
Trigger the quest by talking to Alberto at Hedge Encampment (#1 ).
North East of #1 head over to the Crib of the Moon Dungeon at #2 .
Party up with other players.
Defeat the dungeon.
Report back to Alberto .
Quest #17: Beneath the Moon
+
Quest #17: Beneath the Moon
VIDEO
Watch Quest #16 Guide on YouTube
Objective: Complete the dungeon at the Moon Temple with Alberto.
Steps:
Trigger the quest by talking to Alberto at Hedge Encampment (#1 ).
Walk Eastward from #1 and head to the Moon Temple Dungeon .
Party up with other players.
Defeat the dungeon.
Report back to Alberto .
Quest #18: Path of Firewall Defender
+
Quest #18: Path of Firewall Defender
Objective: Follow the Path of the Firewall Defender by defeating chroma monsters.
Steps:
Quest starts at #1 by talking to George .
Teleport to Blue Bastion City .
Enter through Beryl Plaza .
Go to the Mage Hall at #2 .
Speak to all 4 colored mages and activate all specialization quests (Quest 18 to Quest 21).
Exit Beryl Plaza .
From Blue Bastion make your way to #3 , #4 , #5 , and #6 in any order.
Defeat each chroma monsters on each location.
Report back to the mages at #2 .
Quests #18 to #21 Complete .
Quest #19: Path of Arctic Warden
+
Quest #19: Path of Arctic Warden
Objective: Follow the Path of the Arctic Warden by defeating chroma monsters.
Steps:
Quest starts at #1 by talking to George .
Teleport to Blue Bastion City .
Enter through Beryl Plaza .
Go to the Mage Hall at #2 .
Speak to all 4 colored mages and activate all specialization quests (Quest 18 to Quest 21).
Exit Beryl Plaza .
From Blue Bastion make your way to #3 , #4 , #5 , and #6 in any order.
Defeat each chroma monsters on each location.
Report back to the mages at #2 .
Quests #18 to #21 Complete .
Quest #20: Path of the Beast Sage
+
Quest #20: Path of the Beast Sage
Objective: Follow the Path of the Beast Sage by defeating chroma monsters.
Steps:
Quest starts at #1 by talking to George .
Teleport to Blue Bastion City .
Enter through Beryl Plaza .
Go to the Mage Hall at #2 .
Speak to all 4 colored mages and activate all specialization quests (Quest 18 to Quest 21).
Exit Beryl Plaza .
From Blue Bastion make your way to #3 , #4 , #5 , and #6 in any order.
Defeat each chroma monsters on each location.
Report back to the mages at #2 .
Quests #18 to #21 Complete .
Quest #21: Path of the Rave Mage
+
Quest #21: Path of the Rave Mage
Objective: Follow the Path of the Rave Mage by defeating chroma monsters.
Steps:
Quest starts at #1 by talking to George .
Teleport to Blue Bastion City .
Enter through Beryl Plaza .
Go to the Mage Hall at #2 .
Speak to all 4 colored mages and activate all specialization quests (Quest 18 to Quest 21).
Exit Beryl Plaza .
From Blue Bastion make your way to #3 , #4 , #5 , and #6 in any order.
Defeat each chroma monsters on each location.
Report back to the mages at #2 .
Quests #18 to #21 Complete .
Quest #22: The Golden Queen
+
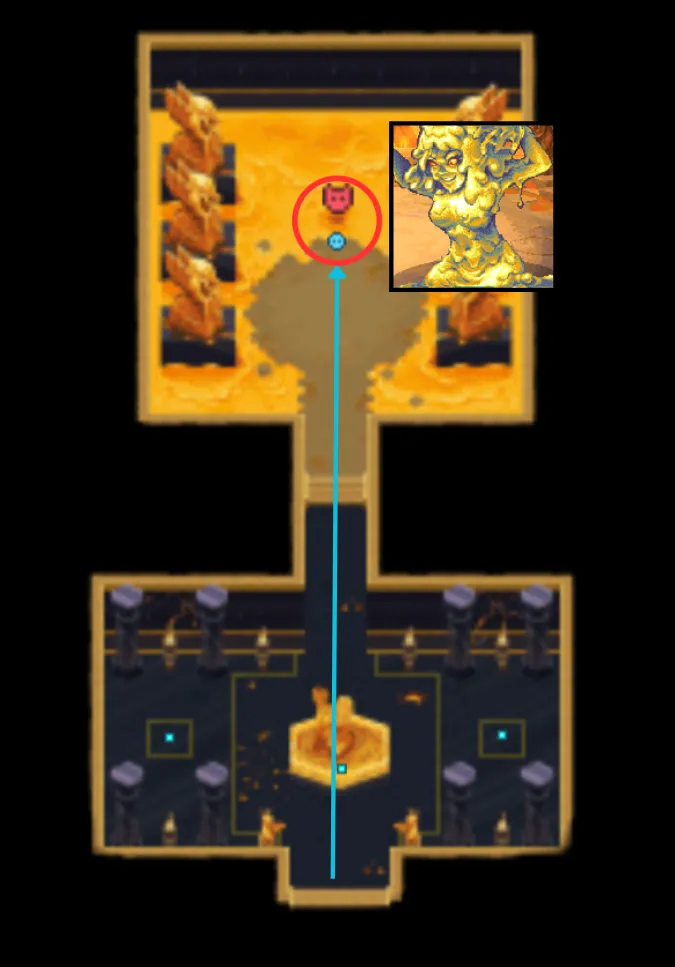
Quest #22: The Golden Queen
VIDEO
Watch Quest #22 Guide on YouTube
Objective: Assist Diva in defeating the dungeon at the Pyramid.
Steps:
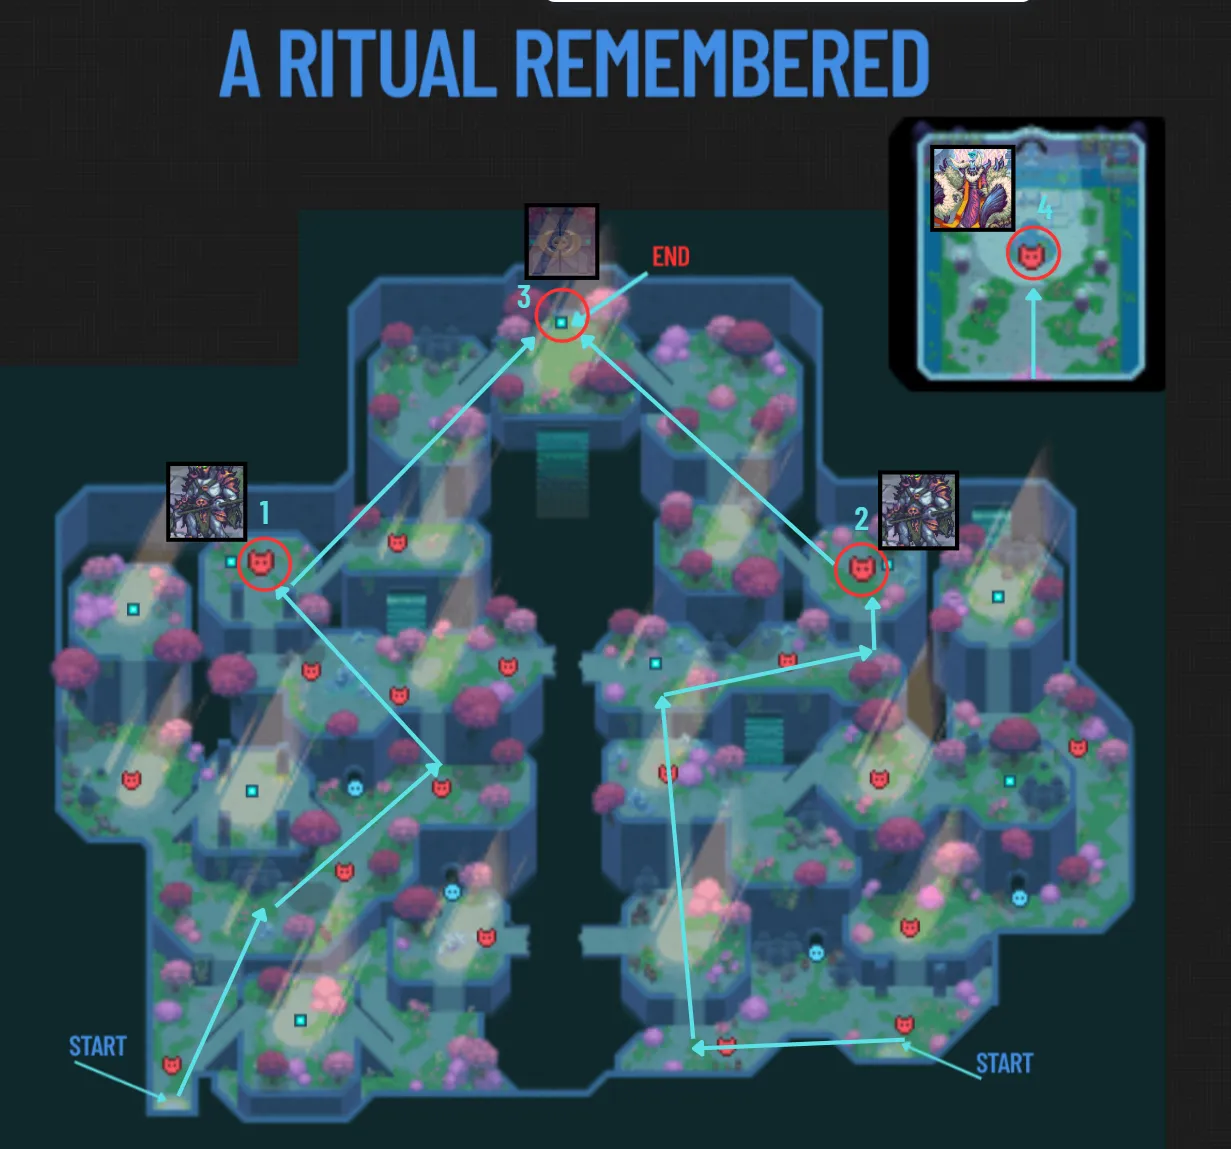
Trigger the quest by talking to Diva at Beryl Plaza Fountain (#1 ).
Talk to her assistant to teleport to the Pyramid .
Party up with other players.
Defeat the dungeon.
Report back to Diva at #1 .
Dungeons
Explore detailed guides for the dungeons in Forgotten Runiverse. Click a dungeon to reveal its room-by-room walkthrough.
The Hollow Tree
+
The Hollow Tree
VIDEO
Watch The Hollow Tree Guide on YouTube
Objective: Navigate through the Hollow Tree dungeon, choosing paths and defeating enemies to reach the final NPC.
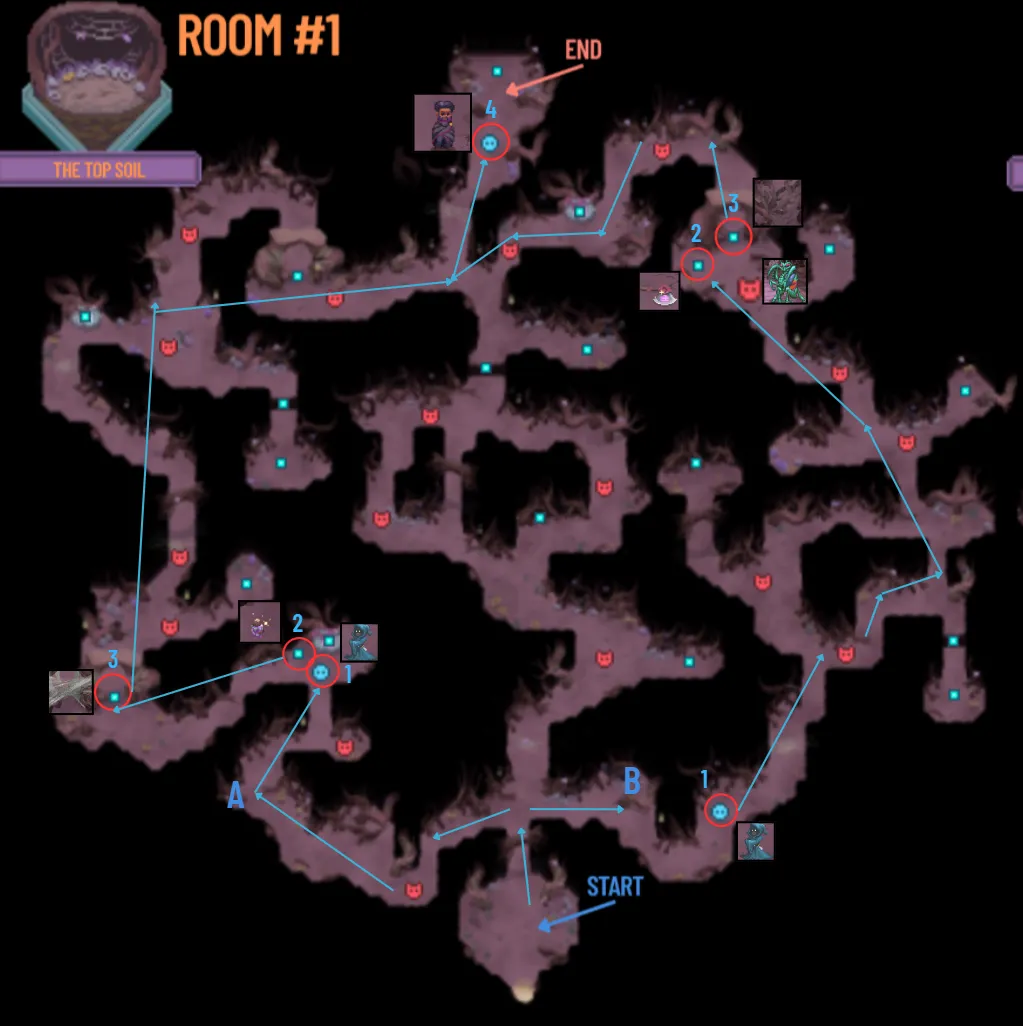
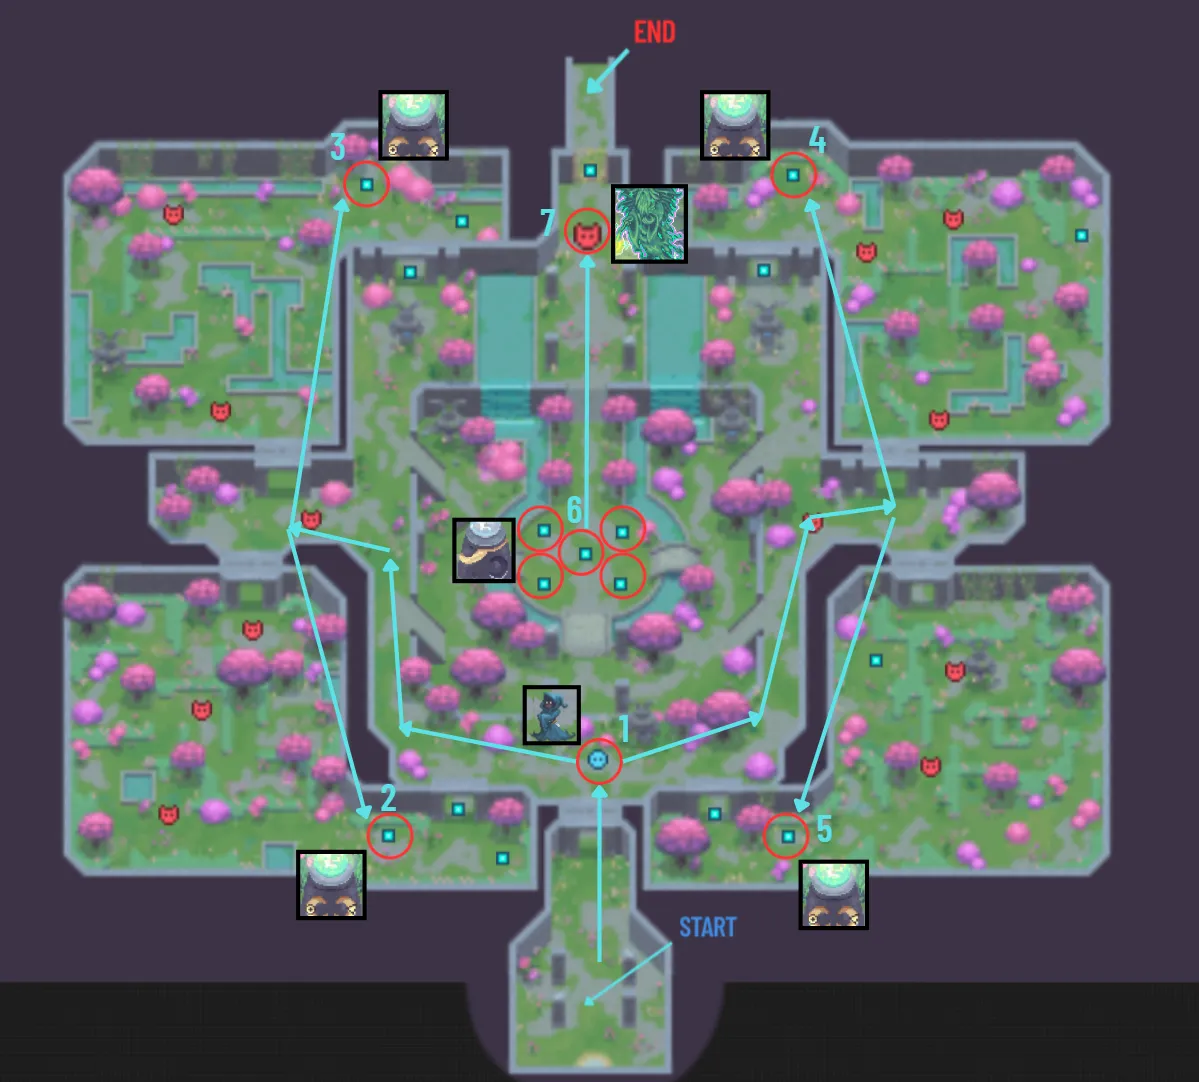
Room 1
Description: Upon entering the dungeon, you will have two paths to choose from: Path A and Path B. Path B allows you to fight a boss for greater rewards.
Path A Steps:
Proceed to the NPC at #1 .
Pick up the Lamp at #2 .
Go to the passage with the web at #3 and burn it.
Proceed to the NPC at #4 .
Path B Steps:
Proceed to the NPC at #1 .
Defeat the Boss near the point at #2 .
Pick up the Axe at #2 .
Go to the passage with branches at #3 and chop them down.
Proceed to the NPC at #4 .
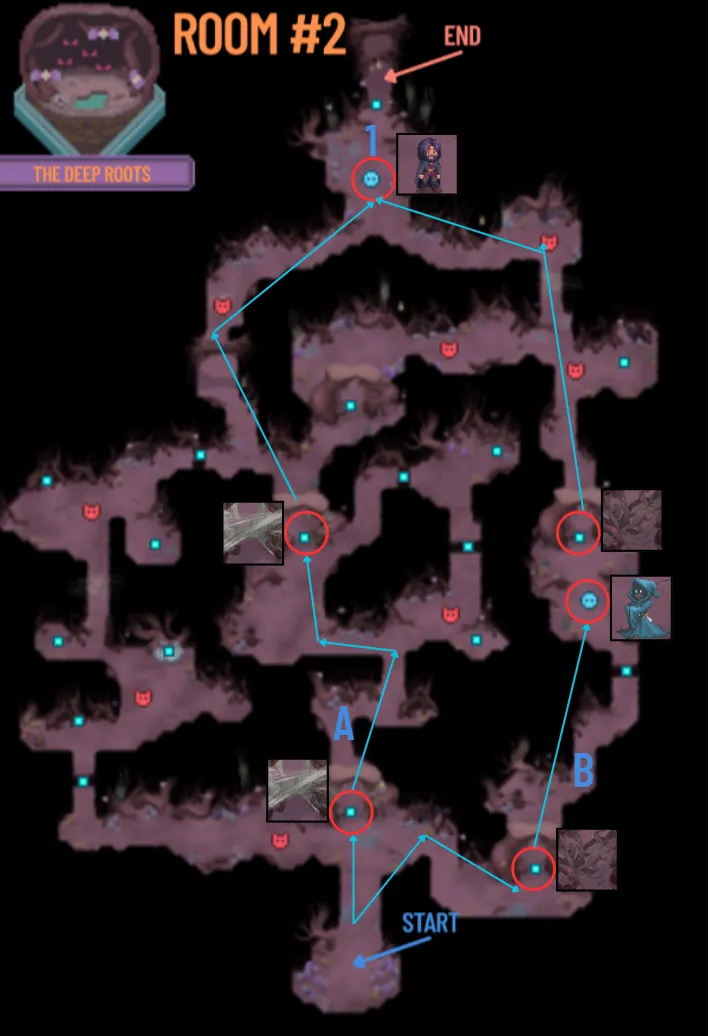
Room 2
Description: Choose your path based on the item you picked up: Path A for the Lamp, Path B for the Axe. Your goal is to reach the NPC at #1 .
Steps:
Proceed to the NPC at #1 using the appropriate path (Lamp for Path A, Axe for Path B).
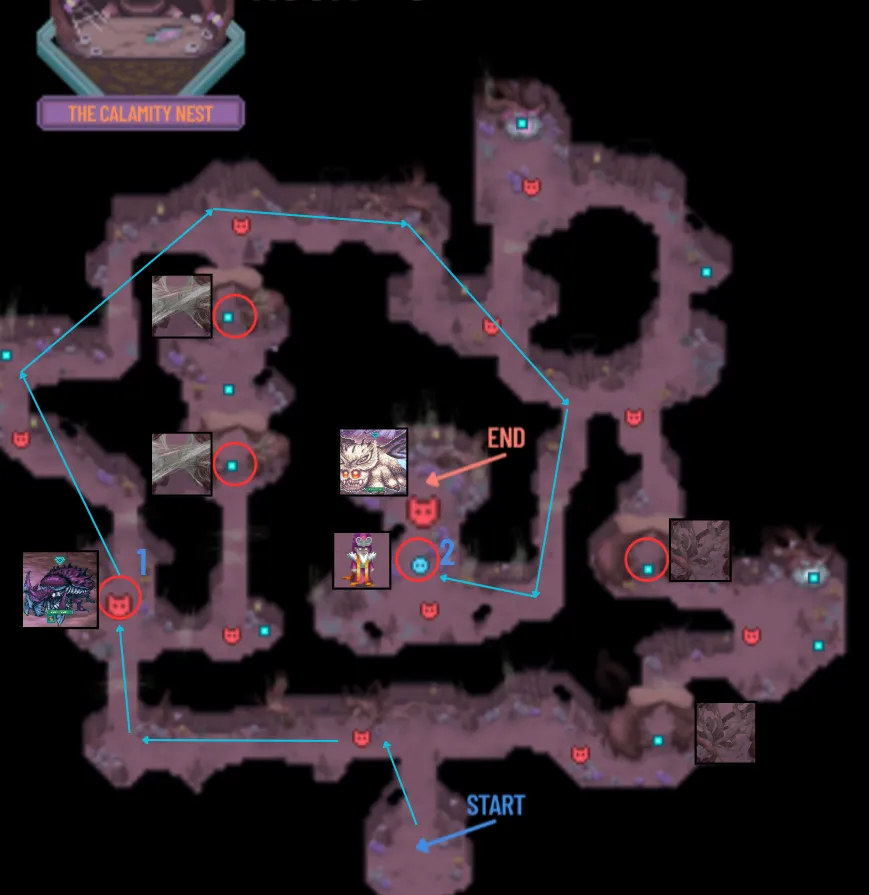
Room 3
Description: It is recommended to follow the drawn path to Objective #1 to fight the boss. Then proceed to Objective #2 to speak with the NPC and engage in combat.
Steps:
Follow the drawn path to Objective #1 and defeat the Boss .
Proceed to Objective #2 and speak with the NPC.
Engage in combat.
Windmill Of The Wild
+
Windmill Of The Wild
VIDEO
Watch Windmill Of The Wild Guide on YouTube
Objective: Navigate through the Windmill Of The Wild dungeon, completing tasks and defeating bosses to progress.
Room 1
Description: Start at the START zone and proceed through two of the three available paths to complete the room.
Steps:
Start at the START zone.
Proceed to the NPC at #1 and assist them in combat.
Move to zone #2 , speak with the same NPC, and choose one of three paths.
Complete two of the three paths:
Go to point #3 .
Defeat the Boss at point #4 .
Pick up the Mushroom at point #5 .
Return to the NPC at point #2 .
Repeat the process for the second path.
After returning to the NPC, you will be teleported to the next area.
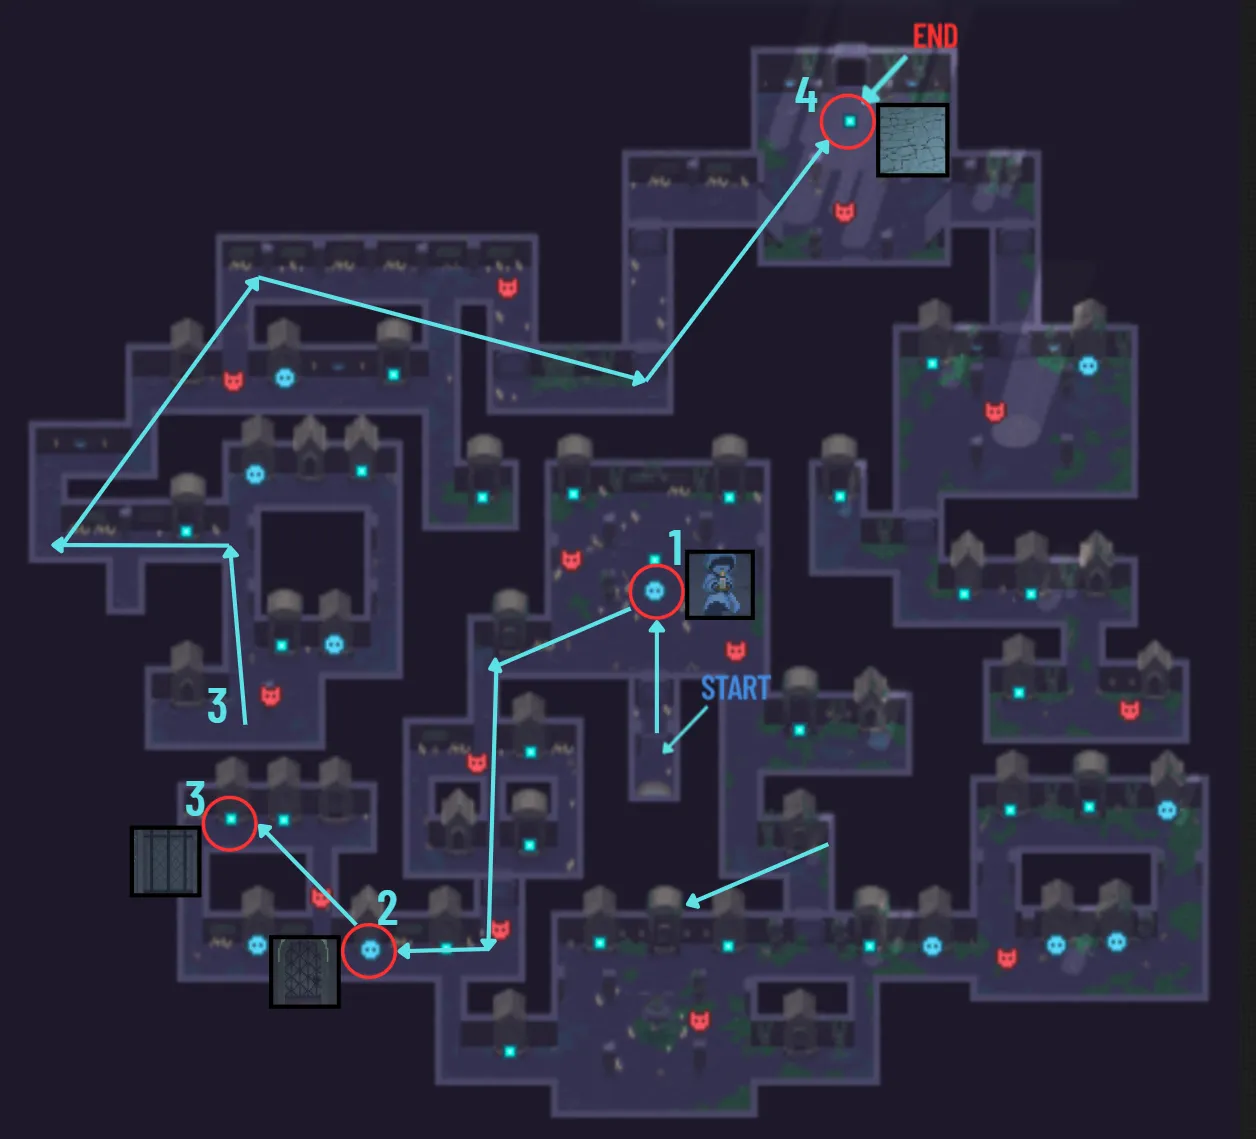
Room 2
Description: Start at the START zone, defeat an optional boss for valuable rewards, and proceed to the final boss.
Steps:
Start at the START zone.
Immediately head to the Boss at point #1 (optional but drops valuable rewards).
Proceed to the NPC at point #2 .
After speaking with the NPC, defeat the Boss at point #3 .
Room Complete .
Crib Of The Moon
+
Crib Of The Moon
VIDEO
Watch Crib Of The Moon Dungeon on YouTube
Objective: Navigate through the Crib Of The Moon dungeon, clearing passages and defeating bosses to complete the dungeon.
Room 1
Description: Start at the START zone and clear four passages to fill the central room with water.
Steps:
Start at the START zone.
Proceed to the NPC at point #1 .
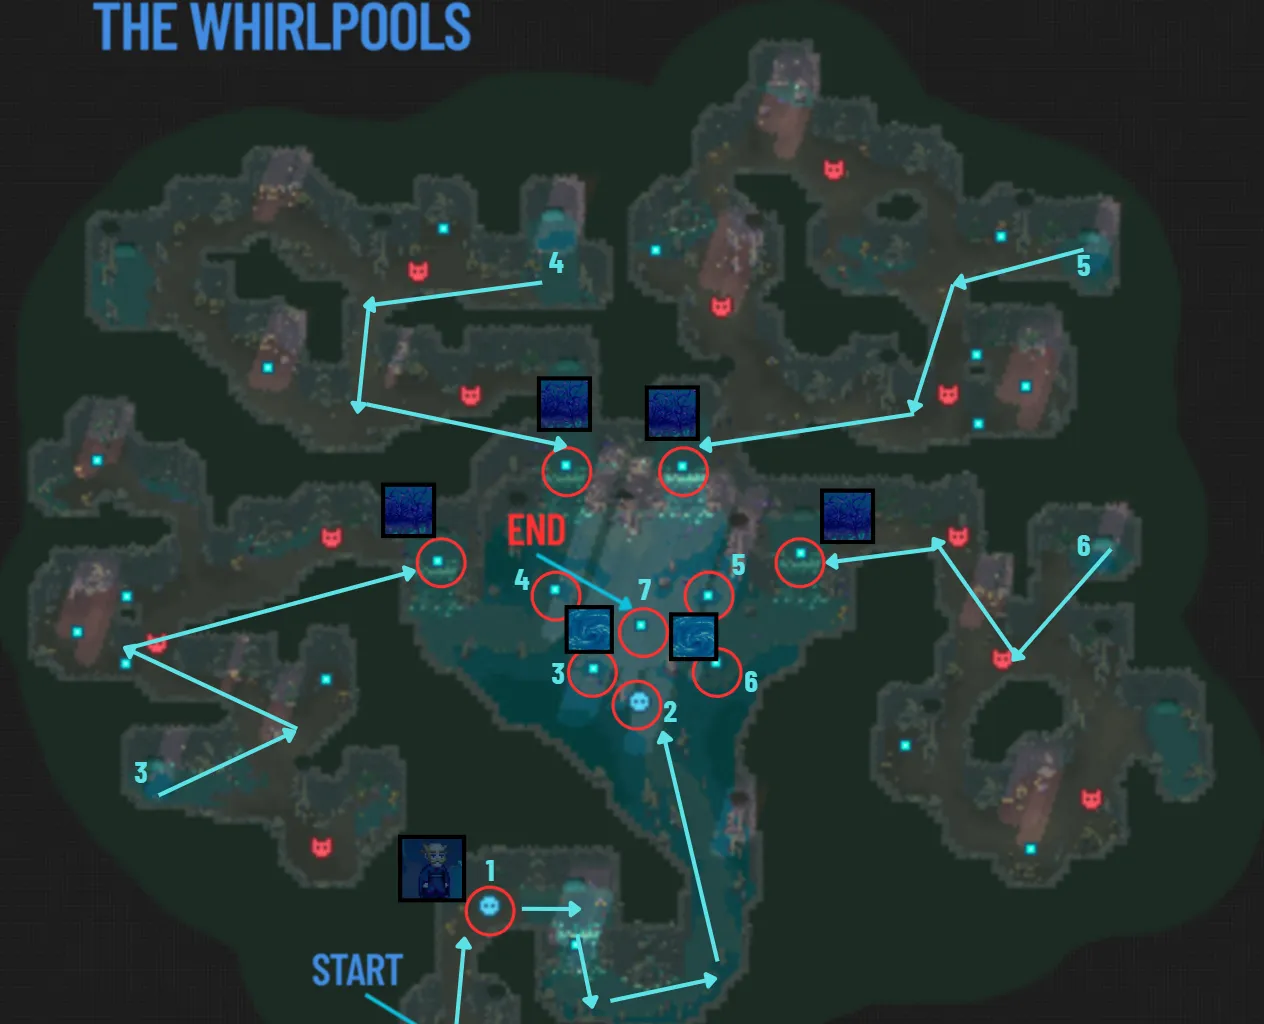
Go to the NPC at point #2 and engage in combat.
Jump into the whirlpools at points #3 , #4 , #5 , and #6 , clearing the passages corresponding to each point to fill the central room with water.
After clearing all four passages, jump into the whirlpool at point #7 .
Room 2
Description: A quick room where you activate a lever and proceed to fight a boss.
Steps:
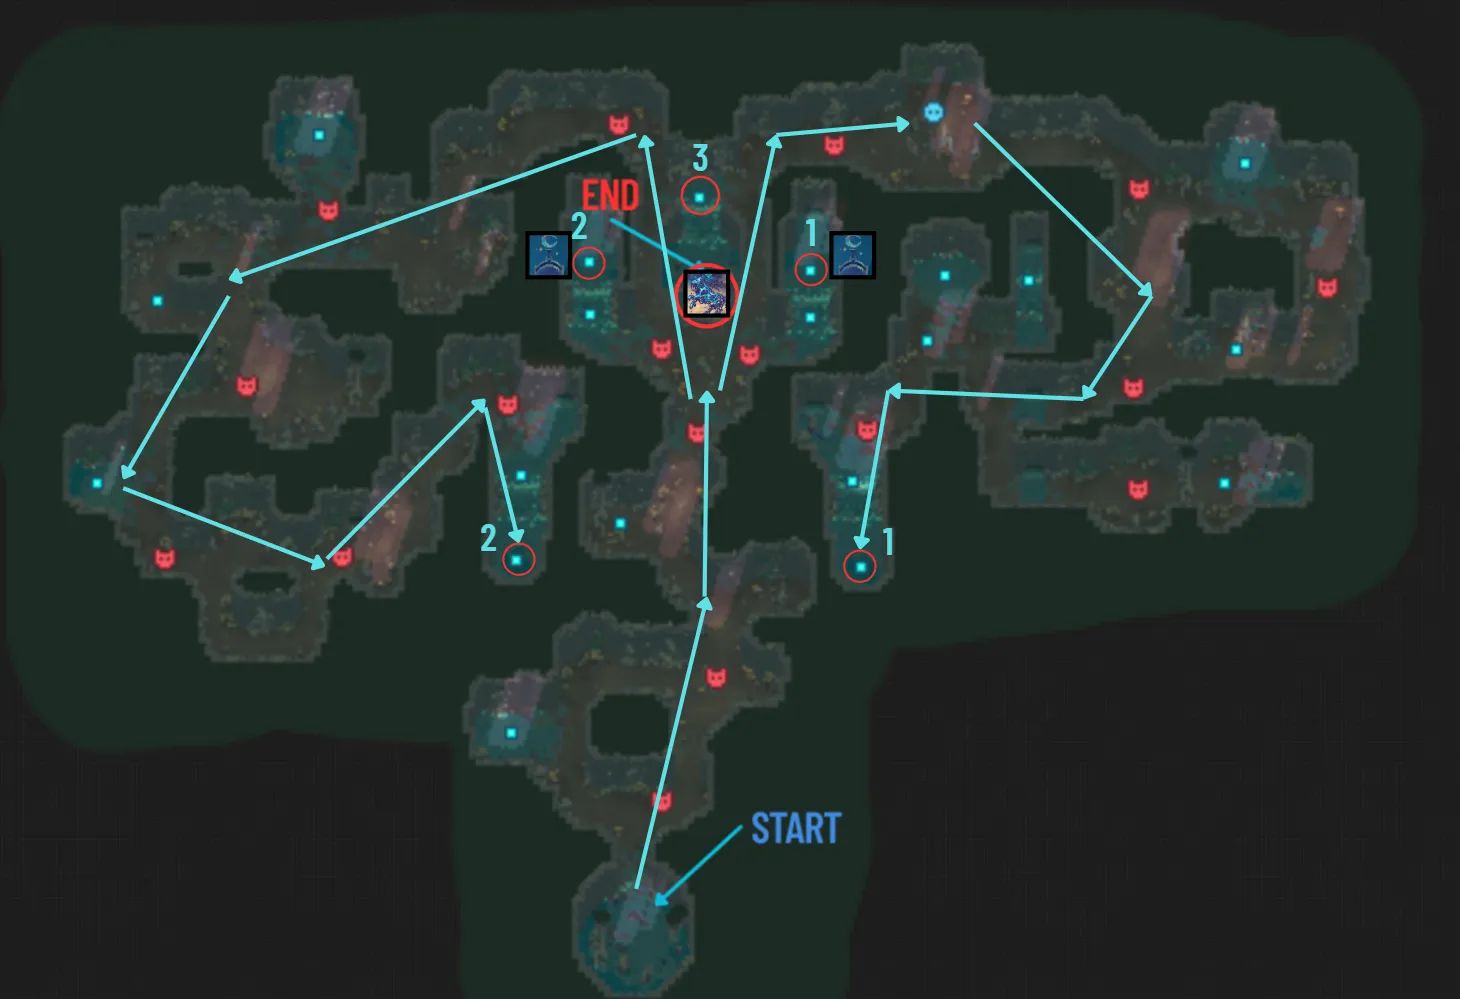
Start at the START zone.
Run to one of the levers along path #1 or #2 .
After activating the lever, proceed to point #3 .
Descend and defeat the Boss .
Room 3
Description: Set the correct whirlpools to reach the boss area.
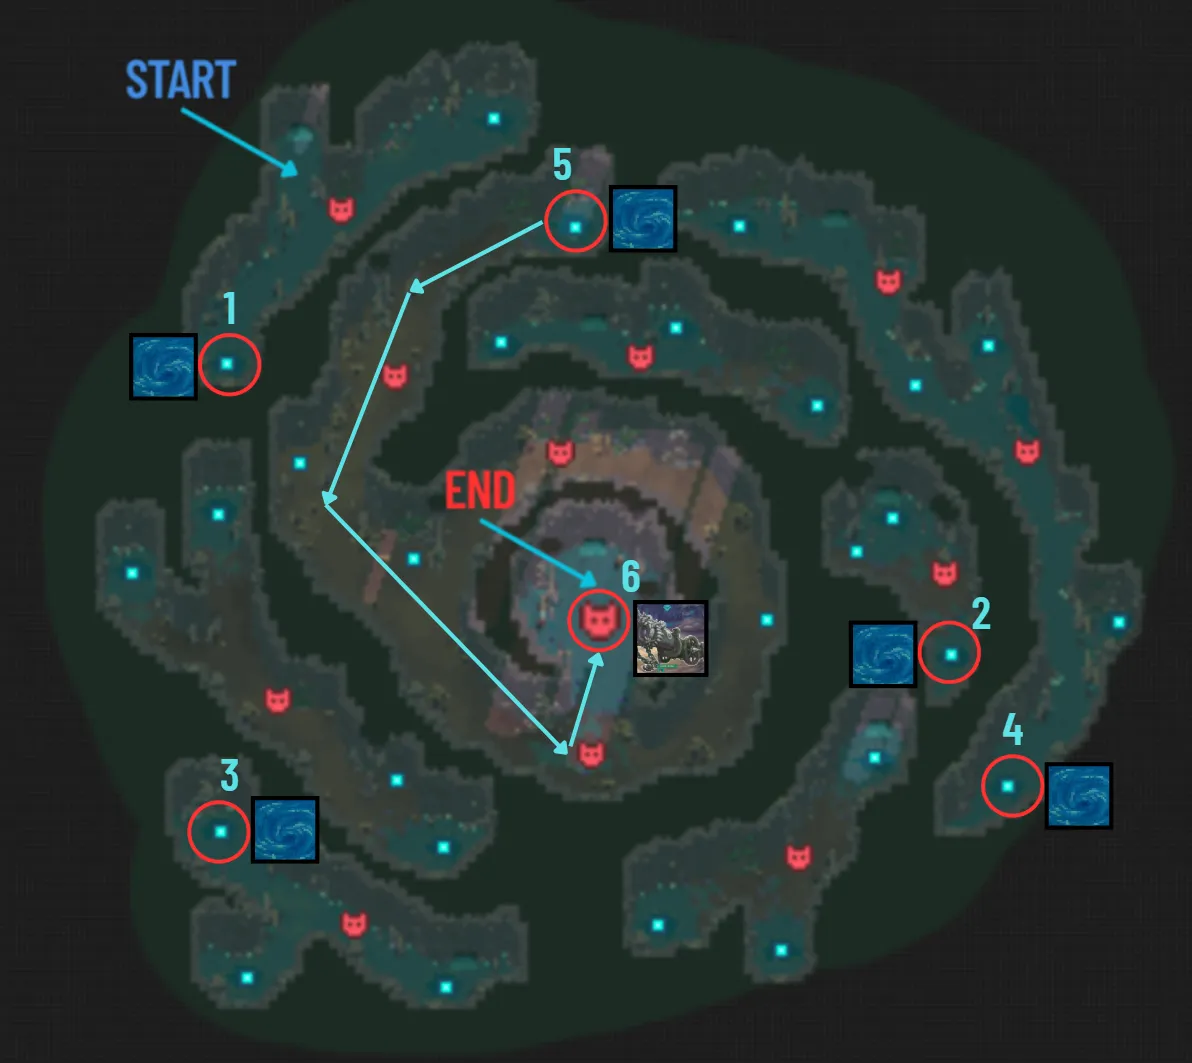
Steps:
Choose the correct whirlpools at points #1 , #2 , #3 , and #4 .
After appearing at point #5 , proceed to the Boss at point #6 .
After defeating the boss, proceed to the next room.
Room 4
Description: Fight an optional boss for greater rewards, then proceed to the final boss.
Steps:
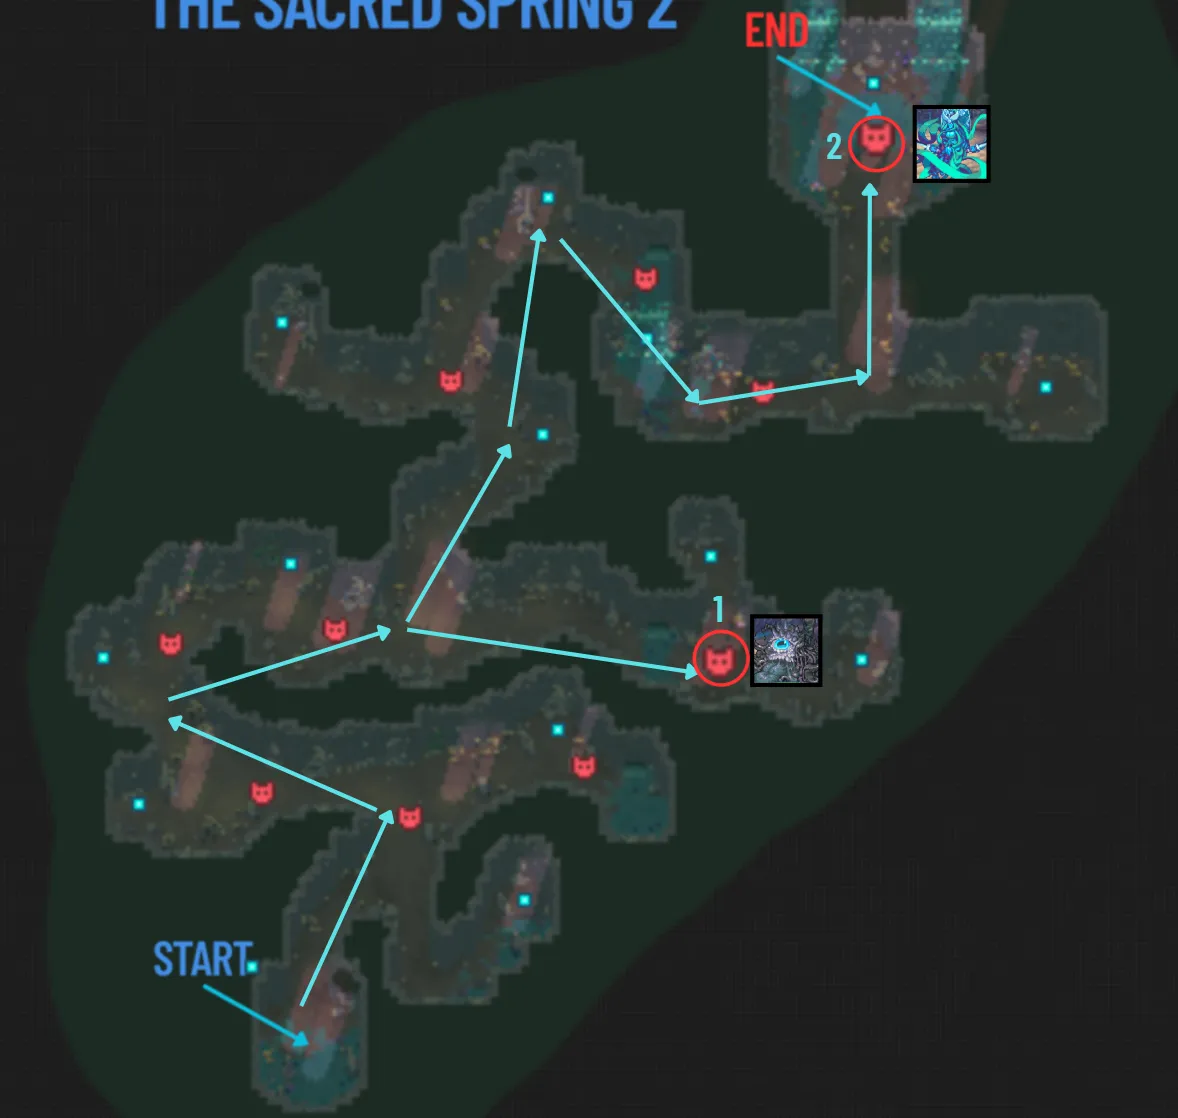
Proceed to point #1 to fight the optional Boss (for greater rewards).
Proceed to the final Boss at point #2 .
Dungeon Complete .
Moon Temple
+
Moon Temple
VIDEO
Watch Moon Temple Dungeon on YouTube
Objective: Navigate through the Moon Temple dungeon, collecting Sun and Moon elements, unlocking passages, and defeating bosses to progress.
Room 1
Description: Start by speaking with the NPC and collecting Sun and Moon elements to unlock the passage to the next level.
Steps:
Proceed to point #1 to speak with the NPC and engage in combat.
Collect two Sun Elements and two Moon Elements at points #2 , #3 , #4 , and #5 . Ensure you collect exactly two of each.
Insert the collected elements into the altars to unlock the passage.
Interact with the figure in the center of the room.
Proceed to point #7 and defeat the Boss .
Room 2
Description: Obtain a key to unlock doors and interact with the floor to move to the next room.
Steps:
Proceed to point #1 and speak with the NPC.
Go to point #2 and pick up the Key .
Use the key from point #2 to unlock the doors at point #3 .
After appearing at point #3 , proceed to point #4 and interact with the floor to move to the next room.
Room 3
Description: Your team will be split into two groups. Each group must defeat a defender to obtain keys to unlock the final door.
Steps:
Your team will be divided into two groups of two players each.
Each group must proceed to the defenders at points #1 and #2 , defeat them, and collect the Keys .
Use the keys to unlock the door at point #3 .
Proceed to point #4 and defeat the Boss .
The Buried Pyramid
+
The Buried Pyramid
VIDEO
Watch The Buried Pyramid Dungeon on YouTube
Objective: Navigate through the Buried Pyramid dungeon, collecting Honey Crystals, freeing NPCs, and defeating bosses to progress.
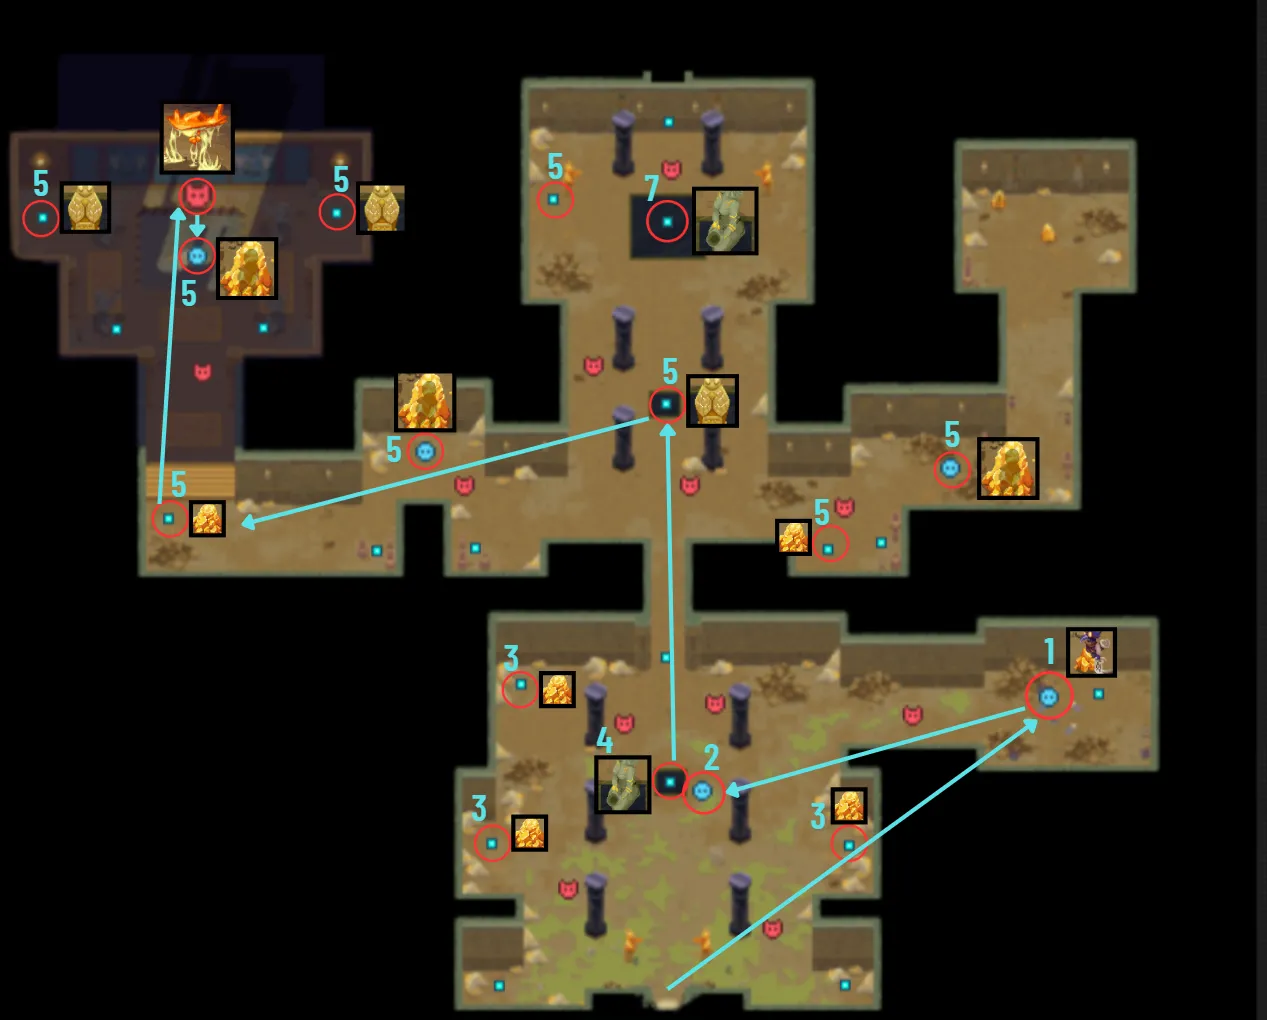
Room 1
Description: Free an NPC, collect Honey Crystals, and make offerings to unlock passages. An optional boss can be fought for extra rewards.
Steps:
Proceed to the NPC at point #1 and free them.
Speak with the NPC again at point #2 to receive an item.
Collect three Honey Crystals at points marked #3 .
Make an offering of three Honey Crystals at point #4 to unlock the doors.
Proceed to point #5 and collect a Honey Crystal . Your goal in this room is to collect a total of four Honey Crystals , all located at points marked #5 .
Optionally, defeat the Boss at point #6 for greater rewards.
With four Honey Crystals collected, proceed to point #7 and unlock the passage to the next zone.
Room 2
Description: Choose between a fast route by fighting guardians or a longer route by collecting Honey Crystals. Freeing NPCs and defeating an optional boss provide additional rewards.
Fast Route Steps:
Immediately proceed to point #1 and defeat the two Guardians (select "nothing" in the dialogue to initiate the fight).
Long Route Steps:
Enter the vault at point #2 .
Collect all Honey Crystals on the map, located at points marked #5 . You need 10 Honey Crystals to proceed or 15 for a buff before the final boss fight.
Free the NPC near the locked vault at point #4 . Freeing all NPCs from crystals will reward you with the final Honey Crystal available in this room.
Optionally, defeat the Boss in the vault at point #7 for additional rewards.
Proceed to the next zone.
Room 3
Description: Proceed directly to the final boss and engage in combat.
Steps:
Proceed to the Boss and engage in combat.
Dungeon Complete .